The double-checked locking pattern (DCLP) is a bit of a notorious case study in lock-free programming. Up until 2004, there was no safe way to implement it in Java. Before C++11, there was no safe way to implement it in portable C++.
As the pattern gained attention for the shortcomings it exposed in those languages, people began to write about it. In 2000, a group of high-profile Java developers got together and signed a declaration entitled “Double-Checked Locking Is Broken”. In 2004, Scott Meyers and Andrei Alexandrescu published an article entitled “C++ and the Perils of Double-Checked Locking”. Both papers are great primers on what DCLP is, and why, at the time, those languages were inadequate for implementing it.
All of that’s in the past. Java now has a revised memory model, with new semantics for the volatile keyword, which makes it possible to implement DCLP safely. Likewise, C++11 has a shiny new memory model and atomic library which enable a wide variety of portable DCLP implementations. C++11, in turn, inspired Mintomic, a small library I released earlier this year which makes it possible to implement DCLP on some older C/C++ compilers as well.
In this post, I’ll focus on the C++ implementations of DCLP.
What Is Double-Checked Locking?
Suppose you have a class which implements the well-known Singleton pattern, and you want to make it thread-safe. The obvious approach is to ensure mutual exclusivity by adding a lock. That way, if two threads call Singleton::getInstance simultaneously, only one of them will create the singleton.
Singleton* Singleton::getInstance() {
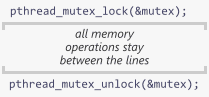
Lock lock; // scope-based lock, released automatically when the function returns
if (m_instance == NULL) {
m_instance = new Singleton;
}
return m_instance;
}
It’s a totally valid approach, but once the singleton is created, there isn’t really any need for the lock anymore. Locks aren’t necessarily slow, but they don’t scale well under heavy contention.
The double-checked locking pattern avoids this lock when the singleton already exists. However, it’s not so simple, as the Meyers-Alexandrescu paper shows. In that paper, the authors describe several flawed attempts to implement DCLP in C++, dissecting each attempt to explain why it’s unsafe. Finally, on page 12, they show an implementation which is safe, but which depends on unspecified, platform-specific memory barriers.
Singleton* Singleton::getInstance() {
    Singleton* tmp = m_instance;
    ...                     // insert memory barrier
    if (tmp == NULL) {
        Lock lock;
        tmp = m_instance;
        if (tmp == NULL) {
            tmp = new Singleton;
            ...             // insert memory barrier
            m_instance = tmp;
        }
    }
    return tmp;
}
Here, we see where the double-checked locking pattern gets its name: We only take a lock when the singleton pointer m_instance is NULL, which serializes the first group of threads which happen to see that value. Once inside the lock, m_instance is checked a second time, so that only the first thread will create the singleton.
This is very close to a working implementation. It’s just missing some kind of memory barrier on the highlighted lines. At the time when the authors wrote the paper, there was no portable C/C++ function which could fill in the blanks. Now, with C++11, there is.
Using C++11 Acquire and Release Fences
You can safely complete the above implementation using acquire and release fences, a subject which I explained at length in my previous post. However, to make this code truly portable, you must also wrap m_instance in a C++11 atomic type and manipulate it using relaxed atomic operations. Here’s the resulting code, with the acquire and release fences highlighted.
std::atomic<Singleton*> Singleton::m_instance;
std::mutex Singleton::m_mutex;

Singleton* Singleton::getInstance() {
    Singleton* tmp = m_instance.load(std::memory_order_relaxed);
    std::atomic_thread_fence(std::memory_order_acquire);
    if (tmp == nullptr) {
        std::lock_guard<std::mutex> lock(m_mutex);
        tmp = m_instance.load(std::memory_order_relaxed);
        if (tmp == nullptr) {
            tmp = new Singleton;
            std::atomic_thread_fence(std::memory_order_release);
            m_instance.store(tmp, std::memory_order_relaxed);
        }
    }
    return tmp;
}
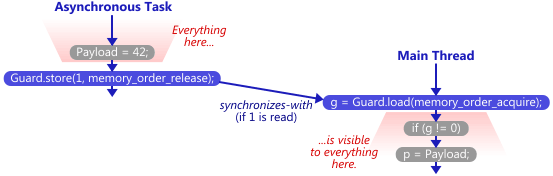
This works reliably, even on multicore systems, because the memory fences establish a synchronizes-with relationship between the thread which creates the singleton and any subsequent thread which skips the lock. Singleton::m_instance acts as the guard variable, and the contents of the singleton itself are the payload.
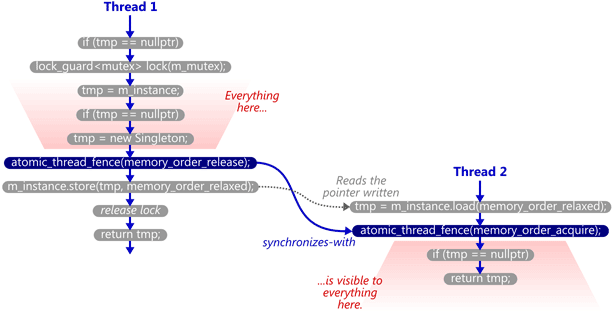
That’s what all those flawed DCLP implementations were missing: Without any synchronizes-with relationship, there was no guarantee that all the writes performed by the first thread – in particular, those performed in the Singleton constructor – were visible to the second thread, even if the m_instance pointer itself was visible! The lock held by the first thread didn’t help, either, since the second thread doesn’t acquire any lock, and can therefore run concurrently.
If you’re looking for a deeper understanding of how and why these fences make DCLP work reliably, there’s some background information in my previous post as well as in earlier posts on this blog.
Using Mintomic Fences
Mintomic is a small C library which provides a subset of functionality from C++11’s atomic library, including acquire and release fences, and which works on older compilers. Mintomic relies on the assumptions of the C++11 memory model – specifically, the absence of out-of-thin-air stores – which is technically not guaranteed by older compilers, but it’s the best we can do without C++11. Keep in mind that these are the circumstances in which we’ve written multithreaded C++ code for years. Out-of-thin-air stores have proven unpopular over time, and good compilers tend not to do it.
Here’s a DCLP implementation using Mintomic’s acquire and release fences. It’s basically equivalent to the previous example using C++11’s acquire and release fences.
mint_atomicPtr_t Singleton::m_instance = { 0 };
mint_mutex_t Singleton::m_mutex;

Singleton* Singleton::getInstance() {
    Singleton* tmp = (Singleton*) mint_load_ptr_relaxed(&m_instance);
    mint_thread_fence_acquire();
    if (tmp == NULL) {
        mint_mutex_lock(&m_mutex);
        tmp = (Singleton*) mint_load_ptr_relaxed(&m_instance);
        if (tmp == NULL) {
            tmp = new Singleton;
            mint_thread_fence_release();
            mint_store_ptr_relaxed(&m_instance, tmp);
        }
        mint_mutex_unlock(&m_mutex);
    }
    return tmp;
}
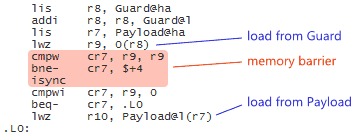
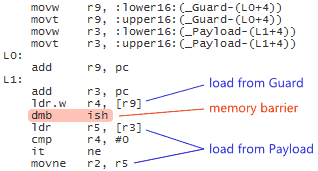
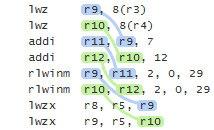
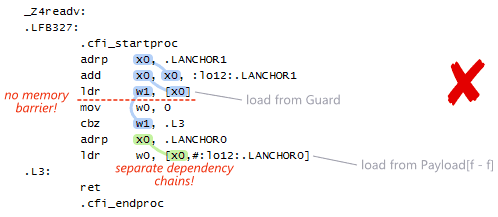
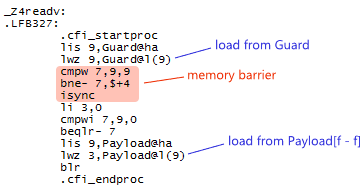
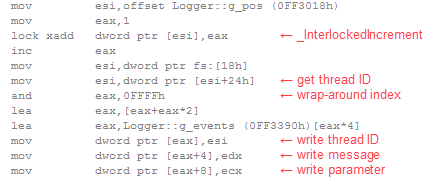
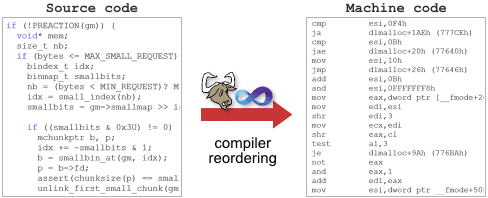
To implement acquire and release fences, Mintomic tries to generate the most efficient machine code possible on every platform it supports. For example, here’s the resulting machine code on Xbox 360, which is based on PowerPC. On this platform, an inline lwsync is the leanest instruction which can serve as both an acquire and release fence.
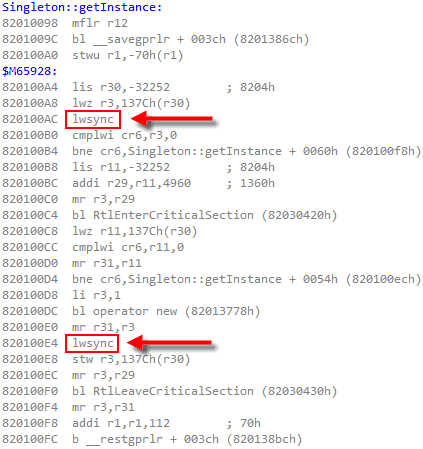
The previous C++11-based example could (and ideally, would) generate the exact same machine code for PowerPC when optimizations are enabled. Unfortunately, I don’t have access to a C++11-compliant PowerPC compiler to verify this.
Using C++11 Low-Level Ordering Constraints
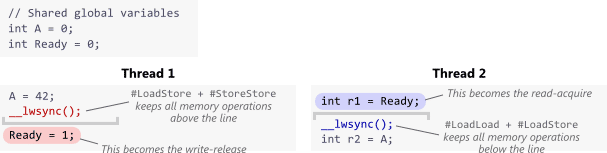
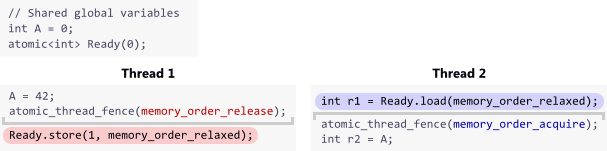
C++11’s acquire and release fences can implement DCLP correctly, and should be able to generate optimal machine code on the majority of today’s multicore devices (as Mintomic does), but they’re not considered very fashionable. The preferred way to achieve the same effect in C++11 is to use atomic operations with low-level ordering constraints. As I’ve shown previously, a write-release can synchronize-with a read-acquire.
std::atomic<Singleton*> Singleton::m_instance;
std::mutex Singleton::m_mutex;

Singleton* Singleton::getInstance() {
    Singleton* tmp = m_instance.load(std::memory_order_acquire);
    if (tmp == nullptr) {
        std::lock_guard<std::mutex> lock(m_mutex);
        tmp = m_instance.load(std::memory_order_relaxed);
        if (tmp == nullptr) {
            tmp = new Singleton;
            m_instance.store(tmp, std::memory_order_release);
        }
    }
    return tmp;
}
Technically, this form of lock-free synchronization is less strict than the form using standalone fences; the above operations are only meant to prevent memory reordering around themselves, as opposed to standalone fences, which are meant to prevent certain kinds of memory reordering around all neighboring operations. Nonetheless, on the x86/64, ARMv6/v7, and PowerPC architectures, the best possible machine code is the same for both forms. For example, in an older post, I showed how C++11 low-level ordering constraints emit dmb instructions on an ARMv7 compiler, which is the same thing you’d expect using standalone fences.
One platform on which the two forms are likely to generate different machine code is Itanium. Itanium can implement C++11’s load(memory_order_acquire) using a single CPU instruction, ld.acq, and store(tmp, memory_order_release) using st.rel. I’d love to investigate the performance difference of these instructions versus standalone fences, but have no access to an Itanium machine.
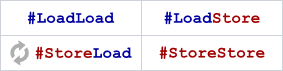
Another such platform is the recently introduced ARMv8 architecture. ARMv8 offers ldar and stlr instructions, which are similar to Itanium’s ld.acq and st.rel instructions, except that they also enforce the heavier StoreLoad ordering between the stlr instruction and any subsequent ldar. In fact, ARMv8’s new instructions are intended to implement C++11’s SC atomics, described next.
Using C++11 Sequentially Consistent Atomics
C++11 offers an entirely different way to write lock-free code. (We can consider DCLP “lock-free” in certain codepaths, since not all threads take the lock.) If you omit the optional std::memory_order argument on all atomic library functions, the default value is std::memory_order_seq_cst, which turns all atomic variables into sequentially consistent (SC) atomics. With SC atomics, the whole algorithm is guaranteed to appear sequentially consistent as long as there are no data races. SC atomics are really similar to volatile variables in Java 5+.
Here’s a DCLP implementation which uses SC atomics. As in all previous examples, the second highlighted line will synchronize-with the first once the singleton is created.
std::atomic<Singleton*> Singleton::m_instance;
std::mutex Singleton::m_mutex;

Singleton* Singleton::getInstance() {
    Singleton* tmp = m_instance.load();
    if (tmp == nullptr) {
        std::lock_guard<std::mutex> lock(m_mutex);
        tmp = m_instance.load();
        if (tmp == nullptr) {
            tmp = new Singleton;
            m_instance.store(tmp);
        }
    }
    return tmp;
}
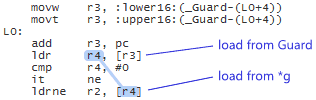
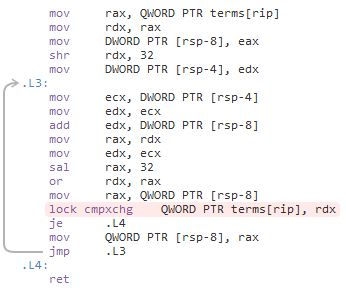
SC atomics are considered easier for programmers to reason about. The tradeoff is that the generated machine code tends to be less efficient than that of the previous examples. For example, here’s some x64 machine code for the above code listing, as generated by Clang 3.3 with optimizations enabled:
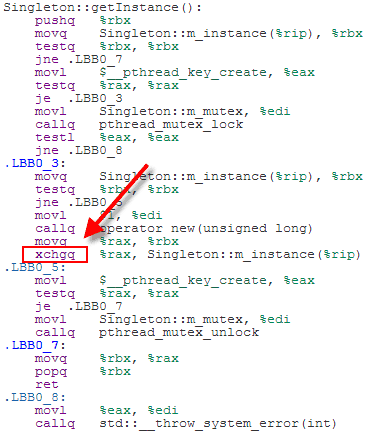
Because we’ve used SC atomics, the store to m_instance has been implemented using an xchg instruction, which acts as a full memory fence on x64. That’s heavier instruction than DCLP really needs on x64. A plain mov instruction would have done the job. It doesn’t matter too much, though, since the xchg instruction is only issued once, in the codepath where the singleton is first created.
On the other hand, if you compile SC atomics for PowerPC or ARMv6/v7, you’re pretty much guaranteed lousy machine code. For the gory details, see 00:44:25 - 00:49:16 of Herb Sutter’s atomic<> Weapons talk, part 2.
Using C++11 Data-Dependency Ordering
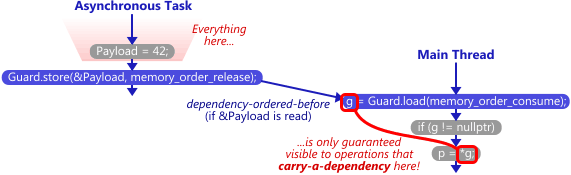
In all of the above examples I’ve shown here, there’s a synchronizes-with relationship between the thread which creates the singleton and any subsequent thread which avoids the lock. The guard variable is the singleton pointer, and the payload is the contents of the singleton itself. In this case, the payload is considered a data dependency of the guard pointer.
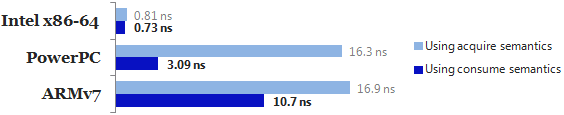
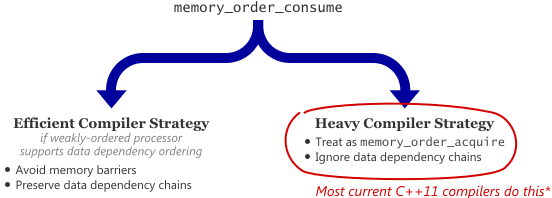
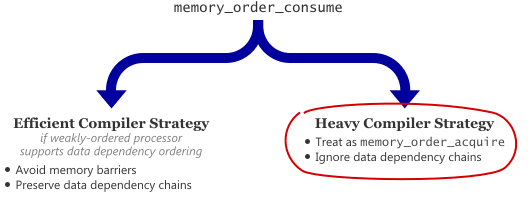
It turns out that when working with data dependencies, a read-acquire operation, which all of the above examples use, is actually overkill! We can do better by performing a consume operation instead. Consume operations are cool because they eliminate one of the lwsync instructions on PowerPC, and one of the dmb instructions on ARMv7. I’ll write more about data dependencies and consume operations in a future post.
Using a C++11 Static Initializer
Some readers already know the punch line to this post: C++11 doesn’t require you to jump through any of the above hoops to get a thread-safe singleton. You can simply use a static initializer.
Singleton& Singleton::getInstance() {
    static Singleton instance;
    return instance;
}
The C++11 standard’s got our back in section 6.7.4:
If control enters the declaration concurrently while the variable is being initialized, the concurrent execution shall wait for completion of the initialization.
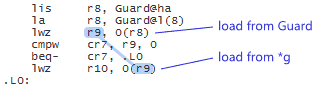
It’s up to the compiler to fill in the implementation details, and DCLP is the obvious choice. There’s no guarantee that the compiler will use DCLP, but it just so happens that some (perhaps most) do. Here’s some machine code generated by GCC 4.6 when compiling for ARM with the -std=c++0x option:
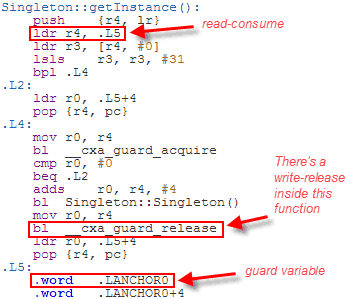
Since the Singleton is constructed at a fixed address, the compiler has introduced a separate guard variable for synchronization purposes. Note in particular that there’s no dmb instruction to act as an acquire fence after the initial read of this guard variable. The guard variable is a pointer to the singleton, and therefore the compiler can take advantage of the data dependency to omit the dmb instruction. __cxa_guard_release performs a write-release on the guard, is therefore dependency-ordered-before the read-consume once the guard has been set, making the whole thing resilient against memory reordering, just like all the previous examples.
As you can see, we’ve come a long way with C++11. Double-checked locking is fixed, and then some!
Personally, I’ve always thought that if you want to initialize a singleton, best to do it at program startup. But DCLP can certainly help you out of a jam. And as it happens, you can also use DCLP to store arbitrary value types in a lock-free hash table. More about that in a future post as well.


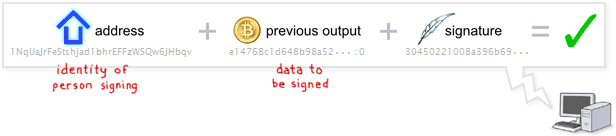
 First and foremost, a bitcoin is a unit of account, in the same sense that a gallon is a unit of volume, or a gram is a unit of weight. You can’t pick up a bitcoin and hold it in your hand like you can a dollar bill. But that’s OK, because that’s not what’s important. What’s important is that:


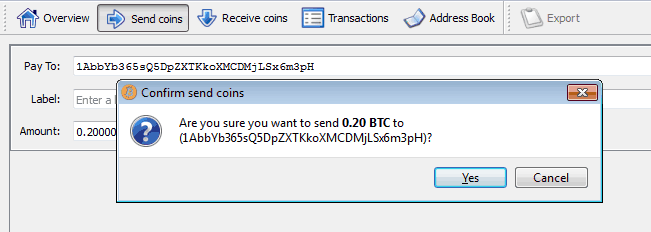
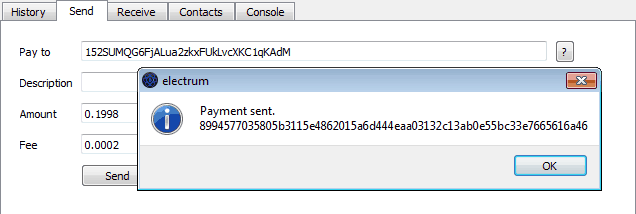
 A desktop wallet is an application you install on Windows, MacOS or Linux. Examples include
  There are also web wallets such as
  A mobile wallet is an app you install on a smartphone or tablet. Many mobile wallets, such as the

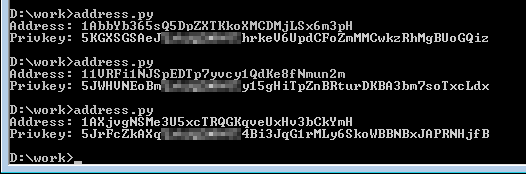
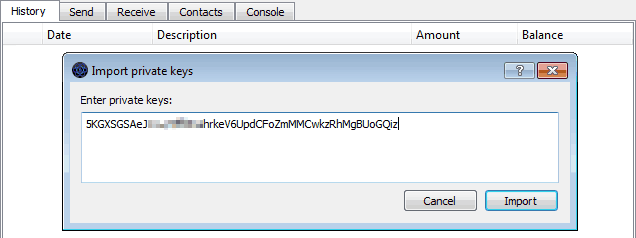
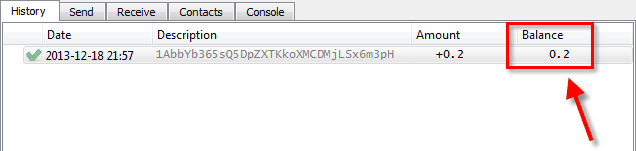
 There is even such a thing as a paper wallet. A paper wallet serves just one purpose: to store your private keys. Some of the above wallets can print your private keys for you, but you can also generate a brand new private key and address pair without an existing wallet.


 , tend to express such operations as class methods, and offer the following succinct definition of lock-free (see
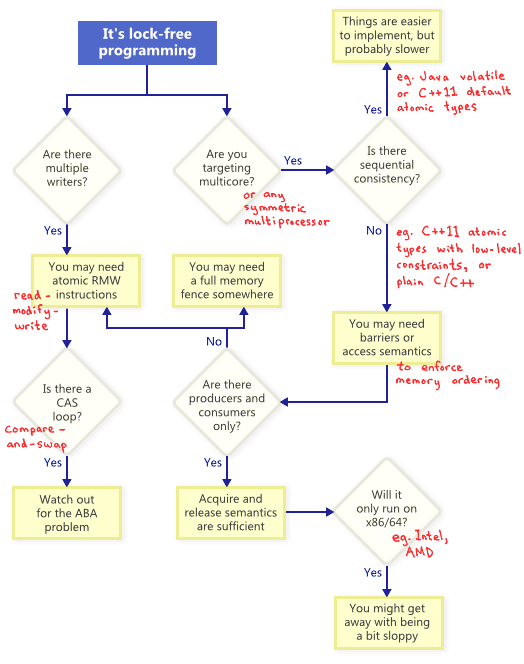


 I may going out on a limb, but I somehow doubt that compilers did a whole lot of instruction reordering in the early 80’s, when CPUs had


 Unlike
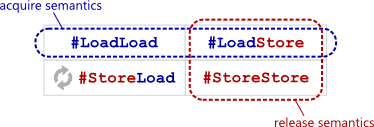
 Acquire semantics is a property which can only apply to operations which read from shared memory, whether they are
  Release semantics is a property which can only apply to operations which write to shared memory, whether they are read-modify-write operations or plain stores. The operation is then considered a write-release. Release semantics prevent memory reordering of the write-release with any read or write operation which precedes it in program order.